
Screening Task Protocol
New GM_AV (Emily’s simplified version)
Requirements
- Software: MATLAB (use 2018b or 2019b version), Matlab Psychtoolbox
- Task Version: cnl/documents/PIPELINE/GM_AV (CNL Mac 5 only)
- Task Version: Desktop/Tasks/Screening2 (Linux)
- Equipment:
- videogame controller or keyboard
- backup microphone
- CNL Mac 5/Linux
- Neuralynx or Blackrock recording system
Description
Participants will be asked to categorize the prepared screening stimuli. Instructions for classification will be presented at the beginning of each round (people, animals, buildings, plants etc).
Cal Mac 5 Procedure:
- Open MATLAB
- Add to path: cnl/Documents/PIPELINE/PARADIGMS/GM_AV
- In Current Folder, navigate to GM_AV directory
- In Command Window, type:
gm_av_serial
- Send TTLs?
Yes (DAQ) if ready to record with patient
No (just playing) if test run
- Press OK to send test TTLs
‘OK’ to verify TTL pulses are being sent from the computer to recording system
‘Skip Test’ if test run without DAQ
- Follow remaining prompts
- Screening task will launch
- Review instructions at the beginning of each round with participant
Linux Procedure:
- For Screening 2: Use Linux Audio Set up guide to prepare the analogue3 recording.
- Open MATLAB with PTB Tab
- Add to path: Desktop/Tasks/Screening2
- Plug in controller connector
- Follow these steps to activate controller
-
Properly Setting Up Controller On Linux #
PsychToolBox won’t automatically detect a connected controller on the Linux computer, so in order to use a controller in the screening task, first plug the Logitech controller USB dongle into the computer and then click on the “Open_Controller_Support” icon on the desktop:
This should open up the AntiMicroX program, and should display the following window:
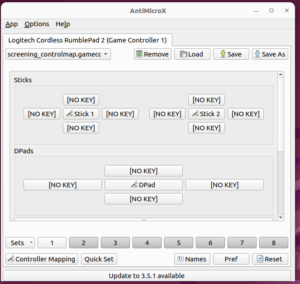
Note: make sure that the controller listed is the “Logitech Cordless RumblePad” and that the config file loaded is “screening_controlmap.gamecontroller.amgp.” By default, clicking on the icon should load the correct profile, but in case the dropdown menu does not display this config file, press the “Load” button and select the “screening_controlmap.gamecontroller.amgp” file (which should be on the desktop)
Keep this window open for as long as you need to use the controllers.
You should now be able to move on to the audio setup steps.
Note: If you double-click the “Open_Controller_Support” icon and nothing opens up, the program might already be running. Look at the top right corner of the screen. If you see a controller icon like the following:

this signifies the program is already running. You should be able to click the controller icon and click “Restore” to bring up the AntiMicroX interface. Note that if the controller is unplugged during this time, you will need to first plug in the controller and then restart the program via the “Open_Controller_Support” icon.
-
- Check to see if controller input is being registered by the software. If not, double check that the screening controller mapping is selected in top right of the software
- In Command Window, type:
gm_av_serial
7. Send TTLs?
Yes (DAQ) if ready to record with patient
No (just playing) if test run
8. Press OK to send test TTLs
‘OK’ to verify TTL pulses are being sent from the computer to recording system
‘Skip Test’ if test run without DAQ
9. Follow remaining prompts
10. Screening task will launch
11. Review instructions at the beginning of each round with participant