
Introduction #
Some of our experiments involve asking participants to watch a 20-40 minute video (a TV episode or part of a movie) and then verbally recall everything they can remember about the video. We use a modified version of PTR (PennTotalRecall) to annotate the the words and the word onset times of verbal recall performed by our participants. We have a pipeline that generates preliminary annotations, and we use the PTR software to manually check and curate the automated annotations.
Annotation guidelines #
We only need to annotate “important” words in the recall, ie we do not need to annotate “ums”, or conjunction words (e.g. “and”, “or”, “if”, “but”). If any “unimportant” words have been automatically annotated you can leave them (whether the timing is correct or not).
For example, in the sentence “Jack Bauer ran to the bus in California and stopped the bomb from injuring Billy Joe. It was a really dangerous scenario”, you would annotate the words “Jack”, “Bauer”, “ran”, “bus”, “California”, “stopped”, “bomb”, “injuring”, “Billy”, “Joe”, “It”, “dangerous”, “scenario”.
For ’24’ videos, the “concepts” we are currently focusing on include:
- Jack Bauer
- Abu Fayed
- Ahmed Amar
- Bill Buchanan
- CTU (“counter terrorism unit”, often referred to as CIA, FBI, government agency, and mentions of characters that work at the CTU [eg Chloe O’Brian, Nadia Yassir])
- White House (which includes mention of the President [Wayne Palmer] and his staff [Tom Lennox, Karen Hayes])
- Sacrifice
- Hostage
So please make sure to definitely annotate any mentions related to the above.
Often names are incorrect or not remembered, just annotate what you can hear and we will work it out from context.
If the automated annotation word is correct but the timing is off by by more than ~100 ms then you should correct the timing.
PTR download instructions #
- Make sure you have Java installed on your computer:
- If unsure, follow the instructions here: https://www.java.com/en/download/help/download_options.html
- Go to: https://github.com/FriedCNL/Penn-TotalRecall/releases/latest to download CNL-PTR
- Download PTR.app.zip, open the zip file, and place PTR.app in your Applications folder
- After these steps, you should be able to open PTR from your applications
Loading files into PTR #
- Check ‘Fried Lab Movie task’ -> ‘24 FR files checklist‘ tab for your session assignment
- Mark your session as “In progress”
- Go to Box -> audio_annotations -> PTR_temp_files -> {participant_ID} -> tmp
- Download ‘.mmw’ , ‘.tmp’, ‘.txt’, and ‘.wav’ zipped files for your session
- For more recent participants there will be one zipped folder containing the 4 files to download
- These files should all have the exact same file names
- Unzip those files into a folder
- Open PTR
- Load .wav file:
- File -> Add Audio Files
- Navigate to .wav file you just extracted
- Load wordpool:
- File -> Select Wordpool
- If annotating a ‘24’ session can use “master word list”
- audio_annotation/human_supplemented_translations/ MASTER_translation_all_free_recall.txt
- Or can use the ‘.txt’ file associated with this session
- Load mmw and tmp files:
- Double click on audio file name in ‘Audio Files’ panel (bottom left panel in PTR)
- You should now be ready to annotate!
How to use PTR #
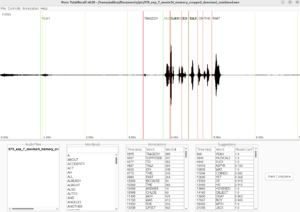
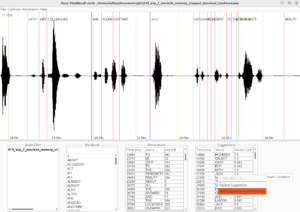
When you first start up the PTR application, it should look something similar to this:
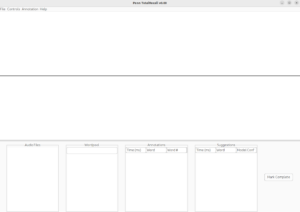
Note: Depending on your computer operating systems, the design of the application interface will look a little different. For MacOS users, the menus will be located on the menubar at the top of your screen, not the application
From the menubar, press File->Add Audio Files… to load the .wav file for the audio you wish to annotate:
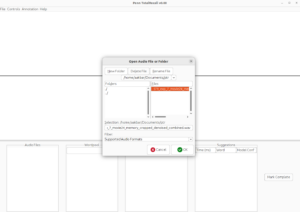
Similarly, from the menubar, press File->Select Wordpool to load the .txt wordpool file you wish to use while annotating:
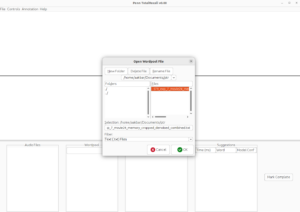
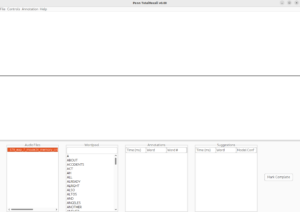
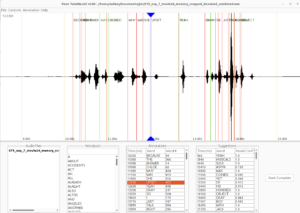
At this point, your “Audio Files” column should display the wav filename and the “Wordpool” column should contain a list of all the words in the wordpool:
Double clicking on the audio filename should bring up a sound waveform as well as a set of annotations and suggestions:
Note: if after clicking the audio filename, nothing shows up in the “Annotations” and “Suggestions” columns, most likely you do not have a correctly named mmw and/or tmp file in the same folder as your wav file. For example, a correctly formatted input folder will have files in the format:
Note that all the files have the same name apart from the extensions. Note also that the extensions are .mmw, .tmp, .txt, and .wav. There are no .gz at the end of any files. If you have a file with .gz at the end, extract the file either by double clicking or using an archive opener tools, and then place the extracted file into your input folder.
If all of the bottom columns in the application have data loaded, you’re ready to begin annotating!
Controlling Audio Playback: #
You can use the following controls to jump around the audio:
Space: pauses/plays the audio
Left/Right Arrows: Moves the audio pointer a little amount backwards/forwards in time (while playback is paused)
Ctrl + Left/Right Arrows: Moves the audio pointer 50ms backwards/forwards in time (while playback is paused)
Ctrl + Shift + Left/Right Arrows: Moves the audio pointer 500ms backwards/forwards in time (while playback is paused)
Ctrl + Z: Play last 200ms of audio (while playback is paused)
You can also click and drag with your mouse over the audio waveform to play that particular segment.
Note: You can also click on the Controls item in the menubar to see a full list of playback controls and their corresponding keybinds
Regarding Annotations/Suggestions: #
PTR contains two columns of words relevant to the final annotation files: Annotations and Suggestions.
Annotations are in RED.
Suggestions are in GREEN.
Annotations are saved in .tmp files, and Suggestions are saved in .mmw files. The .tmp files act as your save space, so any Annotations present in the Annotations columns will be saved even if you close and reopen PTR (as long as you open the correct experiment .tmp file)
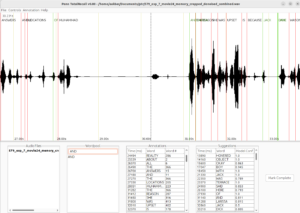
Annotations are word/timestamp pairs that will appear in the final .ann file when “Mark Complete” is pressed, and are represented by red lines with black text on the audio waveform display. Suggestions will not be added to the .ann file unless they are converted to annotations, and are represented by green lines with green text on the audio waveform display. These words were suggested by some of the transcription models (but not all of them), but can be sometimes accurate, so they are included to aid you in your annotations.
To jump to any Annotation/Suggestion, you can double click on the corresponding row in the Annotations/Suggestions columns
If you don’t want a certain annotation, you can right click its row and click “Delete Annotation” to remove the annotation
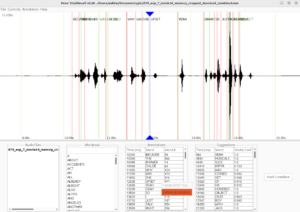
Similarly, if you want to convert a Suggestion to an Annotation, right click the corresponding row and click “Add Suggestion to Annotations”
If you click this option, you will see that the green line will turn to a red line, and the Suggestion row will have been moved to the Annotation row. Now this row will be saved in the final .ann file
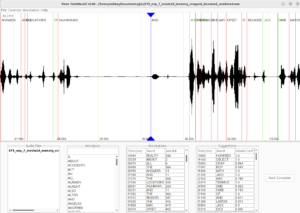
Manually Adding Annotations #
You can use the “Wordpool” column to manually add new entries to the Annotations. If you click the text input box at the top of this column, you can type in the word you wish to add. The wordpool will suggest words to you; if one of those is the word you wish to use, you can double click the suggested word and it will complete the input text box with that word. Otherwise, you can also type out the full word you wish to add, even if the wordpool does not give it as a suggestion. When you have the desired word in the textbox, make sure the box is selected and press Ctrl + Shift + Enter (Note: this is CTRL on Mac also, not the Command Key). You should now see an Annotation with the entered word located at the current location of the audio playback bar.
After pressing Ctrl + Shift + Enter:
Uploading finished files #
- Once you have finished annotating the file you will hit “Mark Complete” converting the “.tmp” file to a “.ann” file in your original input folder

(Note that the original .tmp file in the input folder is now a .ann file. Important: if you wish to re-edit these annotations, you will need to change the .ann extension for this file back to .tmp)
- Please upload this .ann file to the /audio_annotation/Annotations folder.
- Then go back to the ‘Fried Lab Movie task’ -> ‘24 FR files checklist‘ tab and mark then ‘Annotations (.ann)’ column for you session as ‘Present’.
- Please also indicate whether all the words have been annotated or not in the ‘Annotations: All words annotated or not’ column.
- This will typically be “Not all” unless we specifically ask for this to be done in a special case in the future.
Video instructions (includes how to use PTR) #
On Box, navigate to:
audio_annotation/Zooms/PTR_vid/PTR_Suggestions_2024-06-28/PTR_Suggestions_Walkthrough.mp4
An alternative link to the video is: https://drive.google.com/file/d/1AKYSdRSz4ouTCbmMjfoAO10w3QHFjNp5/view
Troubleshooting #
- On MacOS, you will get a security error preventing you from running PTR. Instructions on how to deal with this problem are available here: https://support.apple.com/guide/mac-help/open-a-mac-app-from-an-unknown-developer-mh40616/mac
- If you get an “audio library not loaded” error or the program crashes when you double click your audio file or press spacebar, check your Java installation. I found that only Java versions 6 through 8 work reliably with PTR, so you may need to downgrade your Java version if it is a later version.
- If the mmw and tmp files are not loading not check the file names. The file names need to exactly match the .wav file name otherwise they will not load.