Intro #
For patient testing, montages define the port numbers for both our macro and micro recordings, and essentially create a mapping between montage names and electrode recording ports. As part of the nwbPipeline, the MontageConfigUI provides a GUI to allow for easier creation of both the cfg montage file (used directly by the Neuralynx Pegasus software) as well as the JSON montage descriptor file (used by analysis scripts such as run_unpackNeuralynx). This tool is the recommended way to uniformly create montage files usable by the lab software.
Using MontageConfigUI #
- Make sure nwbPipeline is properly set up on your computer.
- In MATLAB, navigate to the folder containing the nwbPipeline code, right click on it in the folder explorer, and click on Add to Path -> Selected Folders and Subfolders
- Once all folders are added to PATH, type MontageConfigUI in the Command Window and press enter
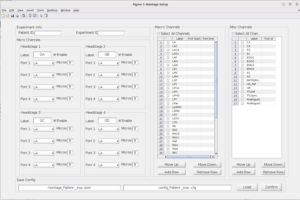
- The MontageConfigUI GUI should now open up, looking something like this:
- In the Experiment Info section at the top, enter the Patient ID (Experiment ID is not required to be filled)
- In the Micro Channels section, use the dropdown menus to specify which micro connects to which headstage port. For example, if RAH is on GB2, you would set Port 2 on the headstage with label GB to be RAH.
- Note: If you wish to use a micro label which is not provided in the dropdown list, simply select the “Custom” label at the end of the list. A textbox should appear under the dropdown, allowing you to enter your label name
- Note: In order to skip a Port (say we want GB1, GB2, and GB4 but not GB3) simply enter 0 for the number of Micros on the port to skip
- In the Macro Channels section, use the checkboxes next to every row you wish to delete. Then press the Remove Row button.
- Note: You can hold down shift and drag your mouse over multiple rows’ checkboxes to quickly select a subset of rows at once
- Note: You will need to delete the rows for any macro label you do not wish to use
- For each macro row you wish to use, enter the Port Start and Port End defined in the Clinical Montage (1-indexed, with macro channels assigned ports between 1-128)
- Note: If you wish to use a macro label which does not exist in the predefined rows, use the Add Row button (which will add a row under the last checked row, or just under the last row if all the rows are unchecked).
- The Misc Channels section UI functions almost identically to that of the Macro Channels, since each row corresponds to only one channel (instead of a bundle), you specify only one port.
- Note: Another difference is that the Analogue1 and Analogue2 channels are always assigned 224 and 225 respectively, regardless of what port numbers are entered in the UI.
- When all the micro bundles, macro bundles, and misc channels have had their port numbers correctly specified in the UI, press the Confirm button in the bottom right. This will create the cfg and JSON montage files in the current directory loaded in the MATLAB file explorer.
- If you want to load an existing JSON montage file, you can press the Load button and select the desired JSON file. This will populate all the Micro Channel, Macro Channel, and Misc Channel fields (but not the Patient ID)