
Introduction #
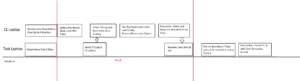
While adaptive screening shares some basic setup steps with regular screening, there are several extra steps required to run this task. This paradigm also requires the CL Alienware laptop, and will require a manual step in the middle of the task. We’ve noticed it takes about 20-30 mins longer than regular screening would take. Here is a diagram giving an overview of the task timeline and what both laptops are doing throughout the experiment:
Setup #
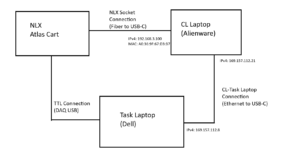
- To begin, setup the Task Laptop the same as you would for regular screening (with the TTL USB and controller connected). Then, add the following network connections:
- On the Task Laptop, when loading stimuli in the stimuli folder, make sure the folders trial1 all the way to trial14 exist. Make sure trial1 -> trial6 all are copies of the same folder with the initial stimuli and that trial7 -> trial14 are all empty folders
- On the Task Laptop, once gm_av_serial.m is opened up as detailed in the regular screening instructions, go through the code and make sure the flag adaptive is set to 1 and that ntrials is set to 14. Save the code.
- On the CL Laptop download both the patient montage JSON file (created by MontageConfigUI) as well as the subject’s trial1 folder containing stimuli created by ScreeningPrepGUI.
- On the CL Laptop, go to the Desktop and double click on the “AdaptiveScreening_inputs” folder. A folder view will open up, with two shortcuts: “montages” and “trials”.
- Double click the “montages” shortcut and copy the downloaded patient montage JSON file to this folder. Make sure to rename it to the following format (case sensitive): montage_Patient-{PT-NUMBER}.json
- e.g. for 592 this would be montage_Patient-592.json
- Go back to the “AdaptiveScreening_inputs” folder and double click on the “trials” shortcut. Make a new folder whose name is the patient number. In this folder, copy the unzipped trial1 folder downloaded earlier
- e.g. for 592, you should now have the folder trials/592/trial1 which has all the non-adaptive stimuli loaded
- Double click the “montages” shortcut and copy the downloaded patient montage JSON file to this folder. Make sure to rename it to the following format (case sensitive): montage_Patient-{PT-NUMBER}.json
- On the CL Laptop, go to the Desktop and double click on the “RunAA99Paradigm” shortcut. A terminal window should open up.
- In this terminal window, type: python setup_adaptivescreening_run.py. Then press enter
- Note: a warning message will display informing you that all previous run data will be wiped to setup inputs. Press y and then enter to continue, but only if you’ve already saved the previous run data (see finishing up the run section)
- Enter the current subject number and press enter. If everything went well, you should see two lines saying something like “Successfully created config file …”
- On the CL Laptop, click on the top right corner of the screen. A set of settings should show up. Press on the arrow right of the “Power Mode” icon and select Performance.
- Note: due to the overclocked CPU, The fans should start loudly running on the laptop; do not worry, this is expected and will result in optimal performance during live spike detection/sorting
- On the CL Laptop, go to the Desktop and double click on the “RunAdaptiveScreeningServer” shortcut. A terminal window should open up and start displaying console text about a Flask Server.
- On the CL Laptop, open up Firefox and go to: http://127.0.0.1:5000/. You should see a site that looks like the following:
You should now be ready to start the task!
Starting the Task #
Note: The order of operations in the next couple of steps are pretty important for making sure the downstream analysis is aligned properly, so try to follow them as exactly as possible!
- On the Atlas cart, start data acqusition through Pegasus.
- On the Task Laptop, start gm_av_serial and go through the configuration/TTL test steps until you get to the **START RECORDING NOW** dialog. Do NOT press “OK” yet.
- On the Atlas cart, start data recording through Pegasus.
- On the CL Laptop, if you still have the terminal window where you ran setup_adaptivescreening_run.py, use this window. Otherwise, go to the Desktop and double click on the “RunAA99Paradigm” shortcut. A terminal window should open up.
- In this window, type ./adaptivescreening_closedloop and press enter
- Wait until you see a line that says something like “Adaptive Screening Model loaded” and a line that says something like “Waiting for first block…”
- Once you see the “Waiting for first block” line in the AA99 program terminal window, on the Task Laptop press “OK” and start the task
- The first 6 rooms will work exactly like normal screening.; simply allow the patient to answer the yes or no questions with the controller. After room 6, a black will appear with the message “Break Time”. At this point, take the controller away from the subject and allow them to rest.
Generating Adaptive Stimuli #
- Once the first 6 rooms are complete, it is time to generate the adaptive stimuli that will be used for the remaining 8 rooms.
- When the “Break Time” screen appears on the Task Laptop, go to the CL Laptop and navigate to the terminal window running the adaptivescreening_closedloop program. Type a positive integer into the window and then press enter.
- You should see the program begin its spike scoring phase. Wait until the program completes and exits
- On the CL Laptop, click on the top right corner of the screen. A set of settings should show up. Press on the arrow right of the “Power Mode” icon and select Balanced.
- Note: the fan speed should now die down
- On the CL Laptop, navigate to Firefox and go to the tab with the site opened in the setup steps (http://127.0.0.1:5000/). Click on the “Get TTLLog button” and wait for a minute.
- A success message should appear, and the “Create Rasters” button should now become green. Press that button and wait a couple of minutes.
- A set of rasters and corresponding stimuli images will display. For whichever stimuli you wish to generate adaptive stimuli from, simply press the corresponding “Generate Stimuli” button
- Note: the text box next to this button can be used to change the search topic for image generation. If you search with the same term multiple times it will bring a new set of images following that term.
- When you want to add the stimuli to the new trials, click on its image. A dialogue will pop up allowing you to customize its name and category types, as well as to add it to the subject stimuli set
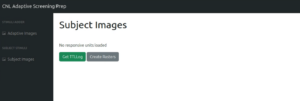
- At any time, you can press the “Subject Images” tab on the left-hand side to see what images will be added to the subject stimuli set. If you wish to remove an image from the set, simply press on it and click “Remove Image”
- To go back to the stimuli generation page, just click on the “Adaptive Images” tab on the left-hand side.
- When you wish to send full set of adaptive images to the Task Laptop, click on the “Subject Images” tab and then the “Upload Stimuli“. Wait until you see a success alert dialog
- You can now press the “ok” button on the Task Laptop controller and finish the remaining rooms with the subject
- The rest of the task should function similarly to regular screening, albeit with less stimuli per room
Finishing the Task #
Anytime after you have finished sending the set of adaptive stimuli to the Task Laptop, you can save the run data on the CL Laptop. To do so:
- On the CL Laptop, go to the Desktop and double click on the “RunAA99Paradigm” shortcut. A terminal window should open up.
- Type python save_adaptivescreening_run.py and press enter
- Enter the subject number and then the experiment type.
- e.g. 592 and then Screening1
- On the CL Laptop, go to the Desktop and double click on the “AA99_Saved_Runs” folder. A folder view should open up.
- Double click on adaptivescreening_runs. You should see a folder titled with your patient number and inside should be a folder corresponding to the experiment run, containing model outputs as well as data files.
Analyzing the Data with nwbPipeline #
In order to use this run’s data with the nwbPipeline screening analysis, there are a couple of minimal preprocessing steps you need to take to get the data inputs in the right format.
- From the Task Laptop results, grab room 14’s TTLLog.mat (this will be the ttlLog.mat file for the run), as well as both the stimuli folders trial1 and trial14
- Combine the contents of trial1 and trial14 into 1 folder (this will be the “trial1” folder for the analysis, as it contains the set of all stimuli shown throughout the experiment)
- Since the adaptive screening server isn’t synced to the main stimuli database, there is a chance for repeat IDs. to counter this, download the stimidrenamer.py script from aakbar-tools GitHub and set the paths to your input folders.
- After running the script you should have some directory structure similar to:
- 592_screening1_inputs (or whatever you call your parent input directory)
- from_laptop (contains ttlLog.mat (or whatever you called room 14 ttlLog.mat) and newTTLLog.mat)
- trial1 (contains all trial stimuli now with unique ids)
- 592_screening1_inputs (or whatever you call your parent input directory)
- When running run_screening in nwbPipeline, choose newTTLLog.mat and trial1 as your inputs