

Microelectrode Impedance Testing Protocol #
Required Equipment #
- Neuralynx headstages
- Green touch-proof cable
- Impedance measuring device
- Commercial attachment for impedance checker if commercial wires are being used
- Octopus
- Tape
- Blue book
- Pen
- Initial montage
Chris will usually provide the initial montage
Touch Proof and Octopus:
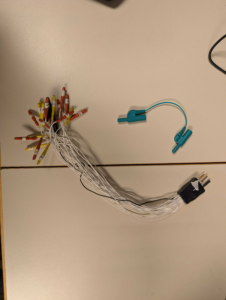
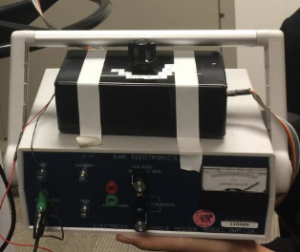
Impedance Tester:
Commercial Attachment for Impedance Measurement Device:

Before Going to the ICU #
- Chris will inform you of the surgery’s progress
- EEG techs to know
- Irvin
- Kristen
- Joey
Typical Schedule:
- Surgery is completed.
- Patient goes to post-op CT.
- Patient is moved to ICU.
- EEG techs enter the ICU first to begin clinical EEG setup.
Coordinate With EEG Techs #
Keep in contact with the EEG techs once they begin setup.
Try to enter the ICU when they are close to finishing, but before they completely tape and wrap all wires.
This is important because research wires and headstages should be positioned in coordination with the EEG techs. This helps reduce tangled wires and signal noise over the patient’s stay.
Electrode Planning #
Review Montage #
Before entering the room, review the montage from Chris.
Montage Contains:
- Electrode region
- Electrode number
- Commercial versus in-house electrodes
- Number of headstages needed
As a general rule, unless Chris notes otherwise:
- Even-numbered electrodes are usually on the right
- Odd-numbered electrodes are usually on the left
Plan Headstage Assignment #
Before setup, create a rough map of which electrodes will go into which headstage.
General guidelines:
- One headstage holds 4 electrodes.
- Keep wires from the same side together when possible.
- Right-sided electrodes should usually go together.
- Left-sided electrodes should usually go together.
- Try to group electrodes that are physically close to each other.
This helps reduce wire tension and tangling, and improves signal quality.
ICU Setup #
Entering the Room #
When entering the ICU:
- Introduce yourself to nursing staff.
- Let everyone know you are with Dr. Fried’s research team.
- Explain that you are setting up research equipment and that it should take about 10–15 minutes.
- Introduce yourself to the patient’s family if present.
- Explain briefly what you are doing.
Maintain confidence when explaining the setup to staff and family.
Before Measuring Impedances #
Before starting impedance testing:
- Make sure all microelectrode wires are visible.
- Confirm that none of the micro wires were buried under EEG tape or wrapping.
- Ask EEG techs to help expose any wires if needed.
- Make sure the microelectrode ground wires are accessible.
Place Ground #
Ask the EEG tech to place the green touch-proof cable, or place it yourself if you feel confident.
The green touch-proof cable allows the research setup to connect to the patient’s scalp ground for the microelectrodes.
Connect Octopus Ground #
Before measuring impedances:
- Connect the base of the octopus cable to the green touch-proof cable.
- Locate each microelectrode ground wire near the white base of each electrode.
- Ground wires are usually blue or black and have a small pin.
- Connect each microelectrode ground wire to the octopus splitter.
- Confirm that all microelectrode grounds are connected.
Measuring Impedances #
Impedance Testing #
Once the grounding setup is complete:
- Set up the impedance tester
- Measure each microelectrode one at a time.
- Record every impedance value immediately.
Microelectrodes:
- With resistor on, calibrate impedance meter at 100K
- Remove the resistor used to calibrate (do NOT lose, no replacement)
- Connect all electrode ground pins (at base of microelectrode ribbon cable) to the clinical ground octopus wires
- Connect microelectrode IDC-10 connector to the impedance meter rainbow ribbon cable
- For each electrode, turn the custom dial from 1-9 and record the impedance value for each channel
- You know you are at channel 0 when the impedance meter maxes out
- If dial > 50 (e.g. impedance is 500K when range= 100K), then increase the range
- If < 0, decrease the range
- If impedance values on most channels > 500k, check octopus ground connection
- Turn OFF the impedance meter (it is battery operated) IMPORTANT
- Reconnect resistor to impedance meter rainbow ribbon cable
Connecting Headstages #
After impedance testing is complete begin connecting microelectrodes to the assigned headstages.
Headstage Placement #
Place headstages in areas that are:
- Comfortable for the patient
- Easy to access
- Less likely to be bumped or pulled
Avoid placing headstages directly on the sides of the head or above the ears, since patients may knock them loose.
Ideally, place headstages more toward the front of the head and keep them spaced apart.
Securing the Setup #
Once electrodes are connected:
- Tape the headstages securely to the patient’s head.
- Make sure wires are not under tension.
- Make sure wires are not overly tangled.
- Do not tape over the part of the headstage where Neuralynx cables connect.
When setup is complete:
- Place the stocking cap back over the patient’s head.
- Thank the patient if they are awake.
- Thank the family if present.
- Let them know the research team will check in again tomorrow.
- Collect all equipment
After ICU Setup #
Waiting for EMU Transfer #
After impedance testing is complete and the patient has been set up in the ICU with the headstages, the next step is usually to wait until the patient’s EMU room is ready.
This usually happens the next day, or sometimes the day after.
Keep track of room availability through:
- Chris
- EEG techs
- Nursing staff
Chris often has a good sense of when a room may become available. EEG techs are also usually informed shortly before a transfer happens. Nurses may be able to provide general estimates, such as whether the move may happen later that day.
Confirm Room Availability #
Once a room becomes available:
- Confirm which EMU room the patient will be transferred to.
- Wait until the room has been cleaned.
- Do not move equipment into the room until cleaning is complete.
- Once the room is cleaned and before the patient is transferred, move the NLX cart into the room.
EMU NLX Setup #
Possible EMU Rooms #
The patient may be transferred into one of the following rooms:
- Room 11
- Room 13
- Room 61
In general, the Neuralynx cart should be placed almost directly across from the bathroom door and on the side of the room where the bathroom is located.
Cart Placement: Rooms 11 and 13 #
For rooms 11 and 13:
- Place the Neuralynx cart on the right side of the patient bed when looking straight at the bed.
- This is also the right side of the wall with the outlets.
- The cart should usually sit closer to the guest couch.
- The cart will typically be across from the bathroom door.
- It will often be next to the EEG Amplifier if one is already present.
This location tends to produce the least electrical noise in recordings.
Cart Placement: Room 61 #
For room 61:
- Place the Neuralynx cart on the left side of the bed when looking straight at the bed.
- As with the other rooms, the cart should generally be across from the bathroom door.
- Place it on the side of the room where the bathroom is located.
Once the Neuralynx cart is in position:
- Plug in the Neuralynx cart power.
- Be aware that the cart may beep periodically when the power conditioner is unplugged.
- Plug the internet cable into the wall port labeled NLX.
- The NLX-labeled port is usually located relatively high on the bed wall.
Cable Noise Precautions #
Avoid placing clinical cables:
- On the Neuralynx power conditioner
- Too close to Neuralynx power wires
- Too close to EEG amplifier power wires
Clinical cables may pick up noise when placed near power sources.
After Patient Transfer to EMU #
Coordinate With EEG Techs #
Once the patient is transferred into the EMU room, the EEG techs will usually come in to set up their clinical recording equipment.
When possible, coordinate Neuralynx setup while EEG techs are present.
This allows the EEG techs to check signal quality, approve the setup, and make adjustments if needed.
Cable Setup Options #
Option 1: BlackRock Cable Setup #
If this is the only patient who will need the Blackrock cables for the next few weeks, it may be preferable to set up the Blackrock cables instead of the standard Neuralynx cables.
This allows the system to remain closed loop ready.
To set up Blackrock cables:
- Connect the Blackrock splitter cables to the patient’s blue pouch.
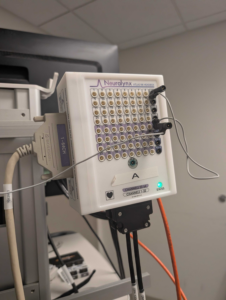
- Connect the splitter cables into the Neuralynx headboxes.
- Connect the cables coming out of the Neuralynx headboxes into the clinical EEG Amplifier.
- Ask EEG techs to check signal quality.
- Make adjustments as needed while EEG techs are present.
Option 2: Standard Neuralynx Setup #
If the Blackrock cables may need to be used for another patient, use the regular Neuralynx setup.
In the usual clinical setup, cables from the patient’s blue pouch go directly to the EEG Clinical Amplifier.
Instead, for Neuralynx recording:
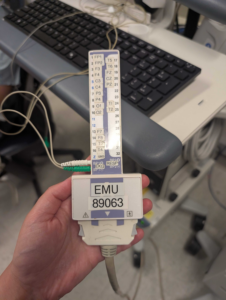
- Ask the EEG techs to let you connect the bottom of the T bar in the blue pouch to the NLX headboxes on the cart via the NK Clinical Cables.
- Connect the cables coming out of the Neuralynx headboxes into the underside of the clinical EEG Amplifier. Channel 1-64 cable should enter the Channel 1-64 slot, and the same for 65-128
- This places Neuralynx as the middleman between the patient’s blue pouch and the clinical monitor.
- Ask the EEG techs to confirm that the clinical signals look good.
- Once signal quality is confirmed, the setup is complete.
NLX Headbox:
T Bar (Located in the blue pouch):
Clinical EEG:
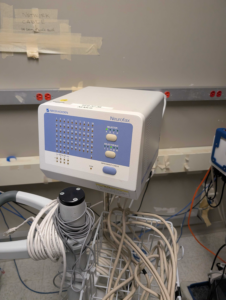
Clinical EEG Underside (This is where the NK cables connect):
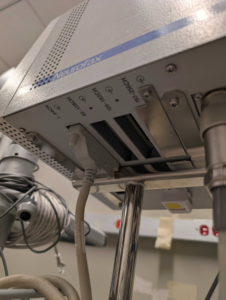
Spontaneous Recording #
If the patient is feeling well after transfer and the EEG team is finished setting up, you may ask whether they are willing to complete a short equipment check recording.
Only ask if it seems appropriate and the patient is in a good mood.
Explain that:
- They do not need to do anything.
- The recording is only an equipment check.
- The goal is to check signal quality and begin initial denoising.
If the patient agrees:
- Plug the cables into the headstages.
- Denoise the signal if needed
- Start a spontaneous recording.
- This may save time later before tasks such as screening.
If EEG Techs Are Not Present #
If the EEG tech is not present when you need to swap or connect cables, proceed carefully
Before disconnecting clinical cables:
- Ask the patient how they are feeling.
- Ask whether they feel like they may have a seizure.
- Maintain a calm and confident demeanor.
If possible, have 2 people conduct this task in order to minimize the time the patient is disconnected from the EEG